
How to Build a Friendly Budget Vinyl Setup Without Sacrificing Quality
So, you want to enjoy the warm, rich sound of vinyl records at home, but you’re not looking to drain your bank account. Good news: a budget vinyl setup that sounds great and treats your records right is totally within reach. Whether you’re just starting out or you’ve dabbled in vinyl before and want to upgrade without overspending, this guide will walk you through every step. We’ll cover what to buy, how to set it up, how to care for your gear, and how to troubleshoot common issues. Let’s get spinning.
Why Go Vinyl? (And Why Budget Matters)
Vinyl records have made a big comeback, and for good reason. There’s something special about the tactile experience of putting on a record, watching it spin, and hearing music in a way that feels alive. But the idea that you need thousands of dollars for a decent setup is a myth. With smart choices, you can build a budget vinyl setup that delivers satisfying sound and keeps your records safe.

The Core Components of a Budget Vinyl Setup
Before we get into specific products, let’s break down what you actually need for a basic vinyl system:
- Turntable: The device that spins your records and reads the grooves.
- Cartridge and Stylus: The part that actually touches the record and converts the grooves into sound. Most entry-level turntables come with one pre-installed.
- Phono Preamp: Boosts the turntable’s weak signal so it can be heard through speakers. Some turntables have this built in.
- Amplification: Either a receiver (amp) or powered speakers.
- Speakers: What you’ll actually hear the music from.
- Cables and Accessories: Wires to connect everything, plus cleaning tools.
Let’s take a closer look at each component, with recommendations and clear explanations.
Choosing the Right Turntable
Your turntable is the heart of your budget vinyl setup. It’s tempting to go for the cheapest option, but the wrong turntable can damage your records and sound disappointing. Here’s what to look for:
What Makes a Good Budget Turntable?
- Solid build: Avoid flimsy plastic.
- Replaceable cartridge/stylus: So you can upgrade or replace as needed.
- Built-in phono preamp (optional): Makes setup easier.
- Automatic or manual: Automatic turntables are easier for beginners; manual gives you more control.
Top Budget Turntables on Amazon
Audio-Technica AT-LP60XBT
This is the go-to starter turntable for many. It’s fully automatic, so you just press a button and the tonearm moves itself. It has a built-in phono preamp and Bluetooth, making it easy to connect to powered speakers or headphones. The sound is clear and warm, and it’s gentle on your records.

- High fidelity audio with bluetooth wireless technology.Wow and flutter : < 0.25% (WTD) at 3 kHz.
- Connects wirelessly to speakers and other devices equipped with bluetooth wireless technology or to wired audio systems …
- Compatible with aptX codec
Sony PS-LX310BT
Another great choice for beginners. It’s automatic, has Bluetooth, and offers USB output if you want to digitize your collection. The built-in preamp means you don’t need extra gear. It’s a bit more expensive than the AT-LP60XBT, but the convenience and extra features are worth it for many.

- EASY OPERATION: Effortlessly enjoy your favorite records with one-step auto start, stop and return.Power source: Corded…
- TWO SPEEDS: 33 1/3 rpm and 45 rpm, with the 45 rpm adaptor stowed neatly in a slot beneath the deck
- HIGH QUALITY AUDIO: Built in switchable phono output / line out phono preamp and 3 gain settings
Audio-Technica AT-LP120XUSB
If you want to get a bit more hands-on, this is a favorite. It’s manual, so you place the tonearm yourself, but you get direct-drive (quieter, steadier speed), pitch control, and USB output. It also has a built-in preamp. This is a great “step-up” turntable that still fits a budget vinyl setup.

- Experience the high-fidelity audio of vinyl
- Direct-drive, DC servo motor with selectable 33/45/78 RPM speeds. Damped base construction for reduced low-frequency fee…
- Fully manual operation featuring adjustable dynamic anti-skate control, variable pitch control with quartz speed lock, a…
What to Avoid
Skip the suitcase-style record players you see everywhere. They look fun, but they often have poor tracking, weak sound, and can even wear out your records faster.
Understanding Cartridges and Styli
The cartridge is the part of the turntable that holds the stylus (needle). The stylus sits in the record groove and vibrates to create sound. Most budget turntables come with an attached cartridge and stylus, but it’s good to know what you’re getting.
- Moving Magnet (MM) cartridges are common in budget setups. They sound good and are easy to replace.
- Stylus replacement: Plan to replace the stylus every 500–1000 hours of play to keep your records and sound quality safe.
The Audio-Technica AT-LP60XBT and AT-LP120XUSB both use Audio-Technica cartridges, which are reliable and easy to replace. You can find replacement styli on Amazon for around $20–$40.
Do You Need a Phono Preamp?
A phono preamp boosts the tiny signal from your turntable to a level your speakers or receiver can use. Without it, your music will sound faint or distorted. Here’s how to know if you need one:
- Turntable with built-in preamp: You’re set. Just connect to powered speakers or a receiver’s “line in.”
- Turntable without built-in preamp: You’ll need an external phono preamp.
Best Budget Phono Preamp
ART DJ PRE II
This little box is a favorite for budget vinyl setups. It’s simple, reliable, and gets the job done for around $50. Plug your turntable into the preamp, then connect the preamp to your speakers or receiver.

Amplification: Powered Speakers or Receiver?
You need something to make your music loud enough to enjoy. You have two main choices:
Powered Speakers
Powered speakers have built-in amplifiers. This is the simplest route for a budget vinyl setup. You just connect your turntable (with preamp) directly to the speakers.
Edifier R1280T
These are a top pick for vinyl beginners. They sound clear, have enough bass for most rooms, and include a remote control. You can find them on Amazon for about $180. Just plug in and play.
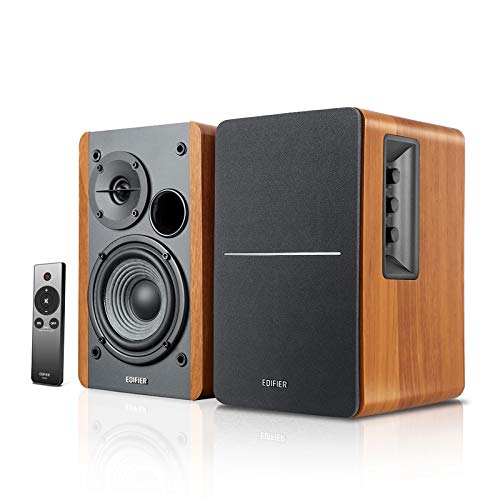
- EXTRA SUB-OUT PORT – A Subwoofer output with automatic detection for connecting an external extra active subwoofer. A bu…
- DUAL RCA INPUTS – Easily connect to any devices with RCA to RCA/3.5 mm-RCA audio cable. Connect to two devices at the sa…
- SUPERIOR SOUND QUALITY – 42W continuous undistorted power, 4-inch sub-woofer unit and 13mm silk dome tweeter unit ensure…

Receiver + Passive Speakers
If you want more flexibility or plan to upgrade later, a stereo receiver (amp) and passive speakers is a classic combo. Many receivers have a “phono” input, which means they have a built-in preamp. If not, you’ll use your external preamp.
You can find affordable stereo receivers from Yamaha, Sony, and Onkyo, usually from $120–$200.
Choosing Speakers for Your Budget Vinyl Setup
Speakers make the biggest difference in how your music sounds. Even with a budget vinyl setup, you can get great sound with the right pair.
Polk Audio T15
These bookshelf speakers are a steal for under $100. They’re compact, easy to drive, and sound warm and balanced. Perfect for small to medium rooms.

- EXPERIENCE AMAZING HOME THEATER SOUND WITH RICH, IMMERSIVE AUDIO – Featuring a 0.75″ tweeter and a 5.25″ Dynamic Balance…
- Use these wall-mountable bookshelf speakers as front, left-right, or rear surrounds in your setup and enjoy clear vocals…
- Start your home theater journey with the T15 speakers and easily build a full 5.1 setup by adding T50 towers, a T30 cent…
Jamo S 803
A step up in clarity and punch, these speakers also have bluetooth connectivity. They look stylish and work well with most receivers.

- Perfect combination of style and performance
- Dolby Atmos ready
- Patent-pending seamless fastening system
Cables and Accessories: Don’t Forget the Details
You’ll need a few extras to get your budget vinyl setup running smoothly:
- Speaker wire: 16-gauge wire is fine for most home setups. Amazon Basics offers affordable rolls.
- RCA cables: Needed to connect your turntable, preamp, and speakers/receiver. Amazon Basics makes reliable, cheap options.
- Carbon fiber record brush: A must for keeping your records clean before each play. This helps reduce pops and crackles.
- Replacement stylus: It’s smart to have a backup on hand.
These accessories are all readily available and won’t add much to your total cost.
Step-by-Step: Setting Up Your Budget Vinyl Setup
Let’s walk through the setup process, step by step.
1. Unbox and Assemble Your Gear
Set up your turntable according to the instructions. If it’s manual, you’ll need to balance the tonearm and set the tracking force. This is usually as simple as turning a dial to match the recommended weight for your cartridge (often around 2 grams).
2. Connect Your Turntable
- With built-in preamp: Plug the RCA cables from your turntable into your powered speakers or receiver’s “line in” or “aux” input.
- Without built-in preamp: Plug the turntable into your external phono preamp, then connect the preamp to your speakers or receiver.
3. Connect Your Speakers
- Powered speakers: Just plug them into the wall and connect the RCA cable from your turntable or preamp.
- Passive speakers: Connect speaker wire from the receiver’s speaker outputs to the binding posts on the back of each speaker. Make sure to match the positive (+) and negative (–) terminals.
4. Place Your Gear for Best Sound
- Turntable: Put it on a stable, level surface away from speakers to avoid vibration.
- Speakers: Place them on stands or shelves, at ear level when you’re sitting. Keep them a few inches from the wall for better bass.
- Cables: Keep them tidy and avoid running power cables parallel to audio cables to reduce hum.
5. Power On and Test
Turn everything on, cue up a record, and slowly raise the volume. You should hear clear, undistorted sound. If it’s too quiet, check that you’re using the right input (phono or line).
How to Get the Best Sound From Your Budget Vinyl Setup
Even with affordable gear, setup makes a big difference. Here are some tips:
- Level your turntable: Use a small bubble level to make sure it’s flat. This helps with tracking and reduces wear.
- Set tracking force correctly: Too heavy will wear records and stylus; too light can cause skipping.
- Clean your records: Use a carbon fiber brush before every play.
- Keep your stylus clean: Use a stylus brush or gel pad regularly.
- Speaker placement: Experiment with angle and distance from walls for the best sound.

Maintenance: Keeping Your Vinyl Setup in Top Shape
Taking care of your gear and records is key to long-term enjoyment and sound quality.
Record Care
- Store records vertically: Leaning or stacking can warp them.
- Keep away from heat and sunlight: Warped records don’t play well.
- Use inner sleeves: Replace paper sleeves with anti-static ones to reduce dust and scratches.
- Clean records regularly: For dirty or used records, consider a record cleaning solution or kit.

- The Only Vinyl Cleaning Kit You’ll Ever Need: extreme care & regular maintenance is paramount to every vinyl album colle…
- Your vinyl record collection deserves the utmost care and attention – When it comes to vinyl cleaning kits, look no furt…
- Flat Velvet Record Brush For Safer Cleaning – the moment you take an album from your vinyl record storage, it’s instantl…
Stylus and Cartridge Care
- Replace your stylus: Every 500–1000 hours of play. If you hear distortion or see visible wear, change it sooner.
- Clean the stylus: Use a stylus brush or special gel pad every few records.
Turntable Maintenance
- Dust cover: Keep it closed when not in use to protect from dust.
- Check belt (if belt-drive): If your turntable starts playing slow or unevenly, the belt may need replacing. Belts are cheap and easy to find on Amazon.
Speaker and Cable Care
- Dust speakers and connections: Dust can build up and affect sound.
- Check cables: Replace any that look frayed or loose.
Troubleshooting Common Problems With Your Budget Vinyl Setup
Even with good gear, you might run into issues. Here’s how to handle the most common ones:
Hum or Buzz
- Check all connections: Make sure cables are firmly plugged in.
- Grounding: If your turntable has a ground wire, connect it to the receiver’s “ground” screw.
- Cable placement: Keep power and audio cables separate.
Distortion or Skipping
- Dirty stylus or record: Clean both.
- Tracking force: Double-check the setting.
- Worn stylus: Replace if needed.
- Warped record: Some records just won’t play well if warped.
Weak or No Sound
- Wrong input: Make sure you’re using “phono” if you don’t have a built-in preamp, or “line” if you do.
- Preamp needed: If your turntable sounds faint, you probably need a preamp.
- Check speaker connections: Make sure wires are secure.
Bluetooth Issues
- Pairing: Make sure your turntable and speakers are in pairing mode.
- Range: Stay within 30 feet for best results.
Upgrading Your Budget Vinyl Setup Over Time
One of the best things about vinyl is that you can start small and upgrade as you go. Here’s how to get the most bang for your buck:
- Upgrade the stylus: An easy, affordable way to improve sound.
- Try better speakers: Speakers make the biggest difference in sound quality.
- Add a better preamp: As your ear gets more critical, a higher-end preamp can bring out more detail.
- Experiment with isolation: Rubber feet or a better turntable mat can reduce vibration.
Final Thoughts: Enjoying Your Budget Vinyl Setup
Building a budget vinyl setup doesn’t mean settling for bad sound or risking your records. With the right turntable, speakers, and a little care, you can enjoy all the magic of vinyl without overspending. Start with what you need, learn as you go, and upgrade when you’re ready. The most important thing is to enjoy the music and the experience.


